FrameWork/Django
Authentication
mansoorrr
2024. 7. 25. 16:39
Authentication은 인증받는 것을 의미한다.
Django는 세션 베이스로 로그인을 하게되면 세션과 쿠키를 생성한다.
그리고 user가 django페이지에 접속하면 자동으로 쿠키를 읽는다.
자동으로 해주지만 커스텀 하기 위해 여러 방법을 알아본다.
[** django Authentication **]
- 장고에서 사용하는 default Authentication은 다음과 같다.
- Authentication은 무조건 views.py들 보다 먼저 실행된다.
#---------- config/settings.py

<생략...>
#Authentication
REST_FRAMEWORK = {
    'DEFAULT_AUTHENTICATION_CLASSES': [
        'rest_framework.authentication.SessionAuthentication',
    ]
}
[** Custom Authentication **]
- 나만의 Authentication Class를 만들어 settings에 적용 가능
- user만 리턴하면 됨. 그러면 view에서 사용하는 reques.user에 사용 가능
- rest_framwork.authentication.BaseAuthentication을 상속받아야 함
- authenticate를 override해야함
- 인자로 self, request를 받음 -> request에는 user에 해당하는 값이 없음
- user를 찾아 반환하거나 없으면 None을 반환
'''
[Authetication 만들기]
1. 클래스 만들기
2. authenticate override
3. settings에 적용

'''
#---------- config/authentication.py

class TrustMeBroAuthentication(BaseAuthentication):

    def authenticate(self, request):
        print(request.headers)
        return None #None을 반환했으므로 인증이 되지 않을 것임


#---------- config/settings.py
#Authentication
REST_FRAMEWORK = {
    'DEFAULT_AUTHENTICATION_CLASSES': [
        'rest_framework.authentication.SessionAuthentication',
        'config.authentication.TrustMeBroAuthentication',
    ]
}
- user를 반환할 수 있도록 코드 작성
class TrustMeBroAuthentication(BaseAuthentication):

    def authenticate(self, request):
        username = request.headers.get('Trust-me')
        if not username:
            return None
        try:
            user = User.objects.get(username=username) #user찾기
            return (user, None) #user반환
        except User.DoesNotExist:
            raise AuthenticationFailed(f"not user: {username}")
[** Token Authentication **]
- django는 기본적으로 TokenAuthentication이 내장되어 있음
- TokenAuthentication이 적용되는 방식
- django가 사용자에게 토큰을 부여 (id와 password를 통해)
- 사용자는 부여받은 토큰을 통해 django에 접속
- django는 사용자별로 부여한 토큰과 사용자가 접속할때 입력한 토큰을 비교하여 일치할 경우 데이터 반환
- 사용방법 및 순서
- settings.py에 rest_framework.authtoken 추가(INSTALLED_APPS)
- settings.py에 REST_FRAMEWORK에 rest_framework.authentication.TokenAuthentication추가
- python manage.py migrate: admin패널에 토큰 테이블 생성
- 토큰을 얻기 위한 url 추가
- postman을 활용해 해당 url로 post요청 보내면 토큰이 생성됨(body에 id, password입력)
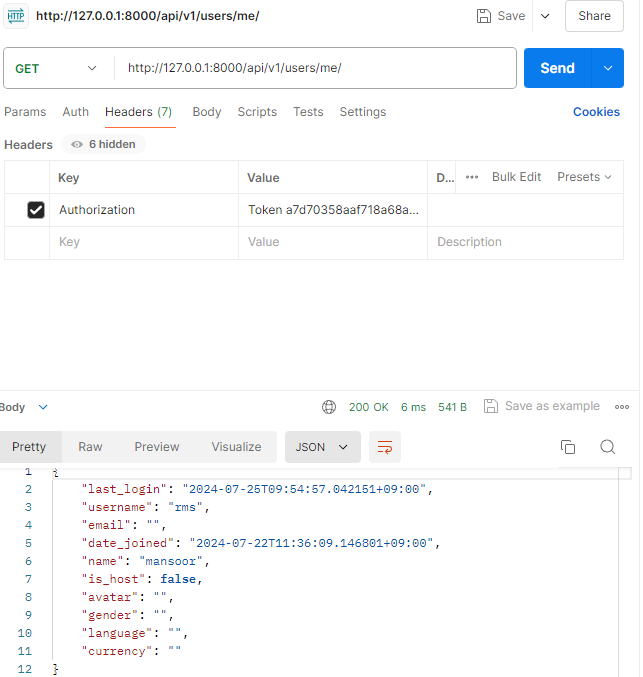
- 부여받은 토큰으로 데이터 확인
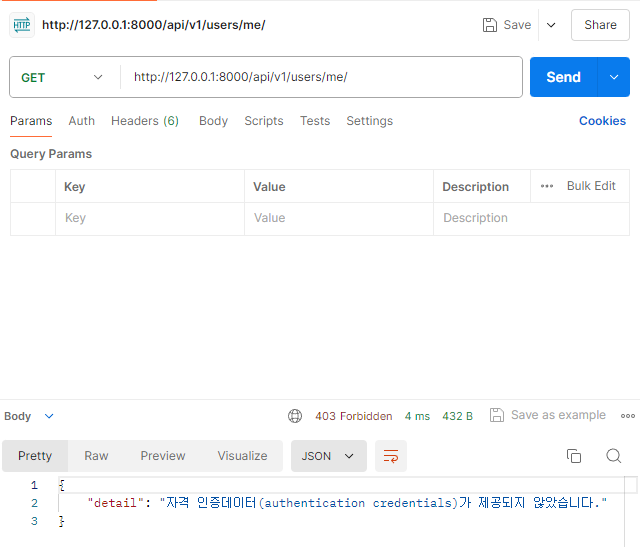
- postman을 통해 /api/v1/users/me로 get방식 요청
- header에 부여받은 인증 토큰을 담아서 보내야 함
- key: Authorization
- value: Token <부여받은 토큰>
- value 작성시 Token입력 후 띄어쓰기 꼭 해야함
#-------------------- config/settings.py

# Application definition
THIRD_PARTY_APPS = [
    "rest_framework",
    "rest_framework.authtoken",
]

# Application definition
CUSTOM_APPS = [
    'users.apps.UsersConfig',
    'rooms.apps.RoomsConfig',
    'common.apps.CommonConfig',
    'experiences.apps.ExperiencesConfig',
    'categories.apps.CategoriesConfig',
    'reviews.apps.ReviewsConfig',
    'wishlists.apps.WishlistsConfig',
    'bookings.apps.BookingsConfig',
    'medias.apps.MediasConfig',
	'direct_messages.apps.DirectMessagesConfig',
]

SYSTEM_APPS = [
    'django.contrib.admin',
    'django.contrib.auth',
    'django.contrib.contenttypes',
    'django.contrib.sessions',
    'django.contrib.messages',
    'django.contrib.staticfiles',
]

INSTALLED_APPS = SYSTEM_APPS + THIRD_PARTY_APPS + CUSTOM_APPS

#Authentication
REST_FRAMEWORK = {
    'DEFAULT_AUTHENTICATION_CLASSES': [
        'rest_framework.authentication.SessionAuthentication',
        'config.authentication.TrustMeBroAuthentication',
        'rest_framework.authentication.TokenAuthentication', #토큰 인증
    ]
}
#----------- users/urls.py
from rest_framework.authtoken.views import obtain_auth_token #토큰 받기 위한 rest_framework의 패키지
urlpatterns = [
path('', Users.as_view()),
path('me/', Me.as_view()),
path('<str:username>', PublicUser.as_view()),
path('change-password/', ChangePassword.as_view()),
path('log-in/', LogIn.as_view()),
path('log-out/', LogOut.as_view()),
path('token-login/', obtain_auth_token), #토큰을 받기 위한 url 추가
]
[** JWT Authentication **]
- Json Web token
- db에 공간을 잡아먹지 않음
- 암호화된 정보를 토큰으로 만들어 유저에게 부여
- 유저가 부여받은 토큰을 django에게 주면 토큰을 해독하여 데이터 보여줌
- pyJWT 라이브러리 사용
- encode: 사용자 정보를 토큰화하여 전달
- payload: user의 어떤 정보를 token화 할 것인지 정함(중요한 정보로 만들면 안됨)
- key: django settings.py에 있는 secret key
- algorithm: 토큰 변환에 사용되는 알고리즘
- decode: 토큰을 사용자 정보로 변환
- encode: 사용자 정보를 토큰화하여 전달
- 별도의 라이브러리는 없으므로 직접 토큰만들어 로그인 하는 로직 구현(Encode)
##---------------- ENCODE

#---------- users/urls.py
urlpatterns = [
    path('', Users.as_view()),
    path('me/', Me.as_view()),
    path('<str:username>', PublicUser.as_view()),
    path('change-password/', ChangePassword.as_view()),
    path('log-in/', LogIn.as_view()),
    path('log-out/', LogOut.as_view()),
    path('token-login/', obtain_auth_token),
    path('jwt-login/', JwtLogin.as_view()), #jwt-login
]

#---------- users/views.py
import jwt
from django.conf import settings

class JwtLogin(APIView):

	def post(self, request):
    	username = request.data.get('username')
        password = request.data.get('password')
        if not username or not password:
        	raise ParseError('입력하세요')

        user = authenticate(
        	request=request,
            username=username,
            password=password
        )

        if not user:
        	raise ParseError('그런사람 없어요')
        #토큰 부여를 위한 encode
        token = jwt.encode(
        	payload={'pk':user.pk},
            key=settings.SECRET_KEY,
            algorithm='HS256'
        )
        return Response({'token':token})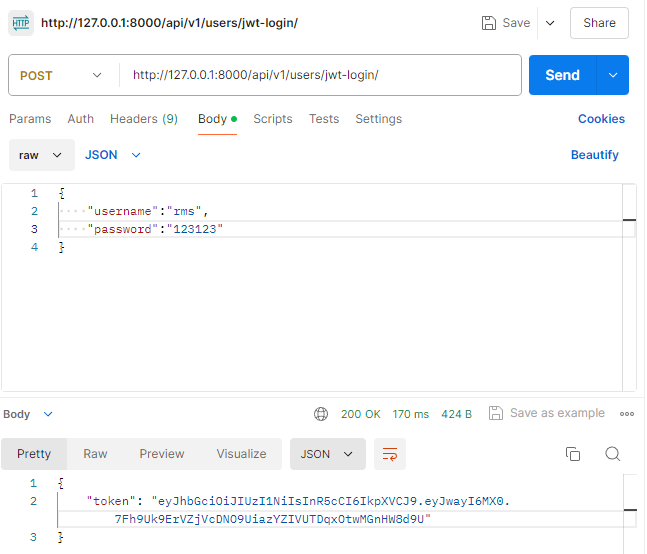
- Decode
- 별도의 authentication class 만들어 복호화 실시
- config/settings.py에 등록
#---------- config/authentication.py
class JWTAuthentication(BaseAuthentication):
    def authenticate(self, request):
        token = request.headers.get('Jwt')
        if not token: #토큰 없으면 유저정보 없음
            raise None
        #복호화
        decoded = jwt.decode(
            token,
            key=settings.SECRET_KEY,
            algorithms=['HS256'],
        )
        pk = decoded.get('pk') #encoding시에 user의 어떤 정보를 토큰으로 만들것인가(pk)
        if not pk:
            raise AuthenticationFailed('Invalid Token')
        try:
            user = User.objects.get(pk=pk)
            return (user, None)
        except:
            raise AuthenticationFailed('user not found')


#---------- config/settings.py
#Authentication
REST_FRAMEWORK = {
    'DEFAULT_AUTHENTICATION_CLASSES': [
        'rest_framework.authentication.SessionAuthentication',
        'config.authentication.TrustMeBroAuthentication',
        'rest_framework.authentication.TokenAuthentication',
        'config.authentication.JWTAuthentication',
    ]
}